Bixelangelo user guide
Getting started
Using Bixelangelo
- Watch the video tutorials
- Modes
- Points
- Control points
- How to make a sketch
- How to trace a bitmap
- How to edit a sketch
- How to view a sketch
- How to make roller coasters
- How to make arrows
- How to make spaghetti strings
- How to save your sketch
- BluffTitler Templates
- Keyboard functions
- Mouse functions
- EPS files
- Options dialog
Info
Download Bixelangelo
| version | Bixelangelo 5.3.2 |
| size | 13 MB |
| date released | Tuesday, March 3rd 2026 |
If clicking the button does nothing, check your Downloads folder or right click and choose Save link as.
System requirements
- Microsoft Windows 11, 10, 8 or 7, 64 bit
- A DirectX 11 compatible graphics card
- 4 MB available hard disk space
- BluffTitler version 16.5.0.2 or higher
Buy Bixelangelo

What you get
When you buy Bixelangelo, you receive your own personal license keys. Entering them into the app with the menu item SETTINGS > Enter license keys... turns the demo version into the fully functional version.
Buy once, use forever
No monthly fees. No annual fees. No additional charges.
Upgrade Bixelangelo
Can I upgrade for free?
Yes. So far, all upgrades of Bixelangelo are free upgrades. This means that your license keys work with the latest version.
How do I upgrade to the latest version of Bixelangelo?
- Check the new system requirements.
- Download and install the latest version from the download page.
Modes
Bixelangelo features 3 modes:

1) Draw freehand
Press d, choose EDIT > Draw freehand, or click on the button in the WINDOW > Mode window.
Use your mouse to draw a sketch. Hold down the <Ctrl> key to draw straight lines.

2) Edit sketch
Press e or choose EDIT > Edit sketch, or click on the button in the WINDOW > Mode window.
Edit the sketch by clicking and dragging the points.

3) Edit roll
Press r or choose EDIT > Edit roll, or click on the button in the WINDOW > Mode window.
Edit the roll by clicking and dragging the roll control points.
Points
Bixelangelo features 3 point types:

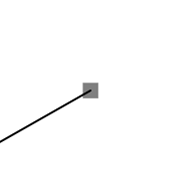
1) Move
A move moves to a new point without drawing a line or a curve: it starts a new path.
2) Line
A line draws a straight line from the previous point to the current point.

3) Curve
A curve draws a bezier curve from the previous point to the current point. Use the Bezier control points to change the shape of the curve.
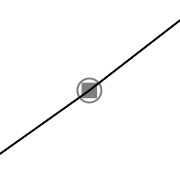
When the path is closed, the last point is rendered inside the big circle of the first point.
The active point can be edited in the Point tool. Press <F7> or choose WINDOW > Point
Control points
Control points are not visible when you render your sketch in BluffTitler, but are used when editing to define the shape.

Bezier control points
The shape of the curves is defined by the 2 bezier control points. Select and move the bezier control points in edit sketch mode.
By deleting a bezier control point (right click with your mouse), the curve is turned into a straight line.

Align
A point can have 2 bezier control points. Mark the Align checkbox in the point dialog(<F7>) to keep the 2 control points aligned.
Press a to toggle the alignment.

Roll control point
The angle of the roll is defined by the roll control point. When riding a roller coaster, the roll control point is on your right side.
Click and move the roll control point in the edit roll mode.
How to make a sketch
A sketch can be made in 4 ways:
1) Draw a sketch by hand
Press d to switch to Draw freehand mode. Left click your mouse button and draw your sketch. Hold down the <Ctrl> key to draw straight lines.
2) Build out of standard elements
Choose WINDOW > Element... to add a standard element to your sketch.
3) Open an EPS file
Choose FILE > Open... to open an EPS file.
The EPS file can also be dropped on Bixelangelo's window.
4) Trace a bitmap

Choose FILE > Trace bitmap... to trace a bitmap. This bitmap can be a PNG with a transparent background or a black shape on a non-transparent white background.
Bixelangelo features a built-in tracer. Alternatively you can use an external tracer.
How to edit a sketch

Press e or choose EDIT > Edit sketch to edit the curve and the bezier control points.
Select a point by left clicking on it.
Move the point by moving your mouse while holding down the left mouse button.
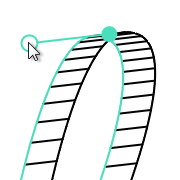
Press r or choose EDIT > Edit roll to edit the roll control points.
Right click on a point to delete it. When you right click on a bezier control point, the curve is turned into a straight line.
Richt click with the <Ctrl> key pressed to delete the line towards the point. This starts a new path at that point.
Connect paths by dropping a startpoint on an endpoint.
For more edit functionality see the keyboard and mouse sections.
How to view a sketch
Press <F1> to <F6> to select a default view.
If a point is selected, this point is used as the centre of view and centre of rotation.
Use the + and - keys on the numeric pad or your mouse wheel to zoom in/out
To move the camera: click on the background, keep holding down the left mouse button and move your mouse.
To rotate the camera: hold down the <Ctrl> key and move your mouse with the left or right mouse button pressed.
How to make roller coasters

Elements
Choose WINDOWS > Element or press <F8> to display the element tool.
Select a standard element from the dropdown, set the properties and click on the Add button. This adds the selected element to the tip of your sketch.
Choose EDIT > Undo or press <Ctrl> + z to undo.
A typical roller coaster starts with a Lift hill followed by a Dive. This gives the cart energy to finish the track.
Smooth
To smooth the transitions between the elements it's important to use a Smooth factor of at least 200 in the FILE > Save as... dialog.
Roll
Roll information is vital for roller coasters. Press r or choose EDIT > Edit roll to view/edit the roll. When riding the roller coaster, the roll control point is on your right side.
Make sure to mark the Roll checkbox in the FILE > Save as... dialog.
Elements
Bixelangelo features the following 14 standard elements:

Straight line
A straight line.

Lift hill
A lift hill, or chain lift is used at the start to give the cart enough energy to finish the ride.

Pre-drop
A pre-drop, kicker, tester hill or trick hill is used right after a lift hill to relieve the stress of the chain or to fool the riders the dive has already started.

Dive
A dive is used after a lift hill to turn the potential energy into speed.
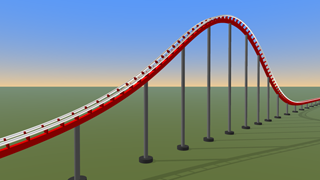
Hill
A simple hump.
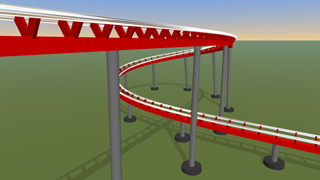
Turn
A turn can be made more exciting by combining it with an elevation.
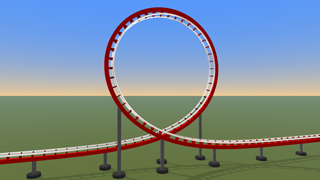
Circular loop
A loop shaped like a circle.
Immelmann turn
This does the same as the Circular loop, but only a half loop. It can be used as a fancy U-turn.

Clothoid loop
A clothoid loop has a lower radius at the top. This way it loses less speed than a circular loop.

Dive loop
A dive loop combines a loop with a turn.
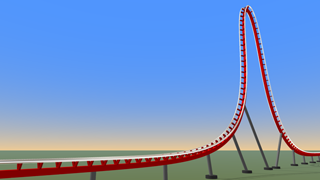
Top hat
A top hat or top cap features a 90° ascent followed by a 90° descent.

Corkscrew
A twist.

Cobra roll
A fancy U-turn that looks like the head of a cobra.

Batwing
A U-turn that looks like the wings of a bat or butterfly.
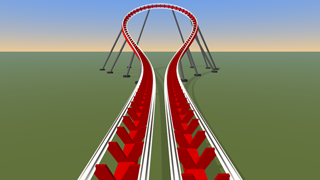
Hammerhead turn
A U-turn often performed by planes.
Road straight
This does the same as the Straight line element, only it does not take over the slope (pitch) of the previous element.
Road bend
This does the same as the Turn element, only it does not take over the slope (pitch) of the previous element.
How to make arrows
Choose TOOLS > Arrows... to start the arrows generator tool.
Input picture
The arrows tool uses a transparent PNG picture as input. Left click on the canvas to select a picture.
Vector file properties
This determines the generated EPS file.
| Arrows | The number of arrows. |
| Radius | The radius of the arrows. Use a higher value for thicker arrows. |
| Length range | The minimum and maximum length of the arrows, relative to the picture diagonal. |
| Max roll | The maximum roll angle between the launch point and arrow head in degrees. |
| Max pitch | The maximum pitch angle between the launch point and arrow head in degrees. When this value is 0, the arrows remain in the same plane. When the Max roll is also 0, the arrows are straight lines. |
BluffTitler show file properties
This determines the generated BT file. All settings can be changed afterwards in BluffTitler.
| Colour 1, 2, 3 | The colours of the arrows. |
| Shape | The cross section of the arrows. |
| Animation | The animation effect. |
Generate button
Every time this button is pressed, new arrows are generated.
Open... button
Allows you to select an EPS file. When this EPS file has been generated by the arrows tool, the arrows tool settings are loaded from this file.
Save as... button
The generated arrows are saved as EPS files. Also a BluffTitler show file is generated to get you started.
When creating a text picture in BluffTitler, set the camera layer to Parallel projection and set the Size property to 250. This way the Font size property is immediately correct when replacing the picture by a text layer.
How to make spaghetti strings
Choose TOOLS > Spaghetti... to start the spaghetti generator tool.
Input picture
The spaghetti tool uses a transparent PNG picture as input. Left click on the canvas to select a picture.
Vector file properties
This determines the generated EPS file.
| Strings | The number of separate strings. |
| Curves per string | The number of Bezier curves per string. A higher number generates a longer string. |
| Radius | The radius of the sphaghetti string. Use a higher value for a thicker string. |
| Margin range | The minimum and maximum distance of the string to the edge of the picture. |
| Curve length range | The minimum and maximum Bezier curve length, relative to the diagonal of the picture. The maximum possible value is 1. |
| Shape jumps | The chance a string jumps to another shape (letter). The maximum possible value is 100. |
| Depth | The depth of the shapes. For a flat picture use 0. When you replace the picture by a text or vector layer, use 6 or higher. |
| Bezier range | This determines the roundness of the Bezier curves. A higher value means a rounder shape, but also a bigger depth distance to the picture. |
| Collision detection | Mark this checkbox to prevent strings intersecting each other. |
BluffTitler show file properties
This determines the generated BT file. All settings can be changed afterwards in BluffTitler.
| Shape | The cross section of the sketch layer, as set by the 1st style (dropdown) of the sketch layer. |
| Texture | The colour map texture of the sketch layer, as set in the MEDIA > Change texture... dialog. |
| Particle | The settings of the attached particle layer. |
| Animation | The animation effect, performed by the Writer and/or FX props of the sketch layer. |
Generate button
Every time this button is pressed, a new random spaghetti sketch is generated.
Open... button
Allows you to select an EPS file. When this EPS file has been generated by the spaghetti tool, the spaghetti tool settings are loaded from this file.
Save as... button
The generated string is saved as an EPS file. Also a BluffTitler show file is generated to get you started.
Picture, text and vector layers
The generated show file renders the input picture as a picture layer. This can be replaced by a vector, text or any other layer type.
When creating a text picture in BluffTitler, set the camera layer to Parallel projection and set the Size property to 250. This way the Font size property is immediately correct when replacing the picture by a text layer.
How to save your sketch
Choose FILE > Save as... to save your sketch.
Mark the Solid checkbox to create a filled shape for use in the vector layer
Non-solid shapes are used in the sketch layer.
Mark the Export roll checkbox to save the roll information. This is important for roller coasters.
To save your sketch as a standard, compatible EPS file for use in other apps, do not export roll and make sure it's 2D.
BluffTitler Templates
To get you started, Bixelangelo generates BluffTitler show files. Templates are offered for:
- spinning logo
- handwritten text
- 1st person roller coaster
- 3rd person roller coaster
- tunnel
By using the BluffTitler GUI, you can adjust all aspects of the generated show: change the colours, change the textures, change the duration, add your own layers,...
Keyboard functions
| a | toggle alignment of the bezier control points.Double press 'a' to mirror the control points. |
| c | centre the sketch |
| d | switch to draw freehand mode. |
| e | switch to edit sketch mode |
| g | toggle ghost mode. This makes a green ghost image of the current sketch. This can be handy when optimizing a sketch to make sure the new version matches the old. |
| n | normalize the size |
| o | modifies the selected line into a perfect arc. If the line is part of a 4 point closed path, it is modified into a perfect circle |
| r | switches to edit roll mode |
| 2 | make 2D |
| +,- | scale up/down |
| +,- numeric pad | zoom in/out |
| <Ctrl> + n | new sketch |
| <Ctrl> + o | open sketch |
| <Ctrl> + s | save sketch |
| <Ctrl> + y | redo |
| <Ctrl> + z | undo |
| <F1> | front view |
| <F2> | back view |
| <F3> | right view |
| <F4> | left view |
| <F5> | top view |
| <F6> | bottom view |
| <F7> | toggle point tool |
| <F8> | toggle element tool |
| <F9> | user guide |
| <F11> | options dialog |
| <Delete> | delete selected point |
| <Ctrl><Delete> | delete line towards selected point |
Mouse functions
| Left click on a point | Select a point. Keep holding down the left button and move your mouse to move the point. This works for points, bezier control points and roll control points. Drag an end point on a begin point to connect 2 paths. |
| <Shift> + left click on a point | Select the 2nd point at the same position, for example the last point of a closed path that has the same position as the first point. |
| Left click on a straight line | Turn the straight line into a bezier curve and select one of its 2 bezier control points |
| Left click on a bezier curve | Select one of the 2 bezier control points of that curve. The mouse automatically moves to this point |
| <Alt> + left click on a line | Create a new point at that position |
| Left click on the background and move your mouse | move the camera |
| <Ctrl> + left or right click on the background and move your mouse | rotate the camera |
| Right click on a point | Delete a point |
| Right click on a bezier control point | Delete the control point: turn the bezier curve into a straight line |
| <Ctrl> + right click on a point | Delete line towards that point |
| Mouse wheel | Zoom in/out |
EPS files
Bixelangelo opens and stores it sketches in the EPS format.
The EPS format is a huge format and Bixelangelo only supports a small subset: the outlines of uncompressed, unoptimized EPS files. But of course, all EPS files saved by Bixelangelo can be opened by Bixelangelo and BluffTitler!
Options dialog
Choose SETTINGS > Options... to open the options dialog.
Pen size
The thickness of the lines.
Point size
The radius of the (control) points.
Grid size
Points are snapped to this gridsize.
Display size
This can be used to correct a bad behaving video driver.
When you use a Windows display setting of 125% or higher and there's an offset between where you click and where the new point appears, first try updating your video driver. If this does not help, set the Bixelangelo display size to the same value as the Windows display size. In this example to 125%.
The neutral value is 100%.
Show help texts
This displays tips to help you using the app.
Colours
The colours of all the GUI elements.
External tracer
Bixelangelo features a built-in tracer. Alternatively you can use an external tracer. In the current version only Potrace is supported. To use Potrace, click on the Browse button and select potrace.exe.
Leave this option blank to use the built-in tracer.
Program history
How do I upgrade to the latest version?
Version 5.3.2
Released: Tuesday, March 3rd 2026
Changes since version 5.0:
- Variable GUI font size
- Arrows tool. Learn more
- Spaghetti tool. Learn more
- 4 new templates: Road 1st person, Road 3rd person, Bob 1st person & Bob 3rd person
- 3 new elements: Immelmann turn, Road straight & Road bend
- 7 new tree types: Beech, Elm, Fir, Juniper, Oak, Palm & Spruce, all in the OBJ format
- 2 new menu items: EDIT > Flip horizontal & EDIT > Flip vertical
- Background picture follows camera position and zoom
- Support for EPS files made by Affinity Designer
- New option in save dialog: Max lines per curve
- Improved templates
Version 5
- 64 bit executable: much faster and access to much more memory!
- 2 tree styles in the FILE > Save as... dialog: Abstract and Realistic
- Easier straight line drawing: hold down <Ctrl> when sketching. This works in combination with the EDIT > Grid mode!
Version 4
- Optimized 2D GUI rendering (GDI to Direct2D)
- Edit and draw in 3D
- 3 modes: draw freehand, edit sketch & edit roll
- Add, delete & move points
- Add & delete lines
- Edit bezier control points
- Edit roll control points
- Grid
- Centre
- Normalize size
- Perfect circle tool
- Ghost mode
- Point tool window
- Element tool window
- Move, rotate & zoom view
- 6 standard views: front, back, left, right, top & bottom
- Built-in bitmap tracer and support for external tracers
- Open and save EPS files
- Build your own roller coasters out of 14 standard elements: Straight line, Lift hill, Pre-drop, Dive, Hill, Turn, Circular loop, Clothoid loop, Dive loop, Top hat, Corkscrew, Cobra roll, Batwing & Hammerhead turn
- 5 BluffTitler show files templates: spinning logo, handwritten text, 1st person roller coaster, 3rd person roller coaster & tunnel
- New menu item: FILE > Load background picture...
- New option: Display size
- Removed feature: sketch maps and vegetation system
- Dependency on MSVCR120.dll removed
Version 3
- New engine powered by DirectX 11
Version 2
- Total redesign: Bixelangelo now features 3 modules: recording, converting and generating sketches
- The text on path effect is now implemented as a text layer attached to a sketch layer and requires BluffTitler 7.6
- Optimized spline rendering
Version 1
- First release!
Troubleshooting
There's an offset between where I click and where the new point appears.
This can happen when using a Windows display setting of 125% or higher in combination with an old video driver. The solution can be found here.