PiPPi | 5 years ago | 12 comments | 6 likes | 987 views
LostBoyz, Krista, Alex-Raymond T. and 3 others like this!
Warning, a wall of text from a layperson.
Bump maps, color maps, displacement maps, normal maps, height maps etc. etc. It's a harrowing subject that I've tried to get a handle on by Googling a lot with no real success. But as usual, empirics is the best way of learning and, as usual, Blufftitler comes to the rescue.
It's been touched on before here but if you want to want to get a solid understanding of the subject matter, I suggest you do the following as it's very very easy, especially considering the underlying complexity of what it's all about.
- Open the sample show "Displacementmapping1.bt", it's under "Media\Shows\Text".
- Save it with media to somehere else on your drive so you can experiment freely, i.e. mess it up big time :)
- Open up the show and change the text to a capital "O". Center it in the render view, extend the show to 5 seconds and have the "O" rotate 360 degrees on the horizontal.
Now for the real fun part. Using any raster image editing software, start playing around with the "Pebbles_Colourmap.png" and "Pebbles_Displacementmap.png" in the local textures folder that you just created.
It doesn't take any hard core image editing skills. I use Paintshop Pro for this and if you can change hue, contrast and brightness then you're in big time. If you're good with raster image software, you're in for an even bigger treat. Just playing with areas of transparency in a .png image will get you some very interesting results.
OK, simplifying it greatly for this exercise, but the colour map image is just that, it's for the colors of the texture.
Displacement map is for the 3D appearance of the texture. The whiter the areas in the displacement image here, the higher "altitude" of that part of the texture. And vice versa of course, the darker the area in the displacement map, the lower "altitude" of the that part of the texture.
You'll get a 100% understanding of that part just by changing the contrast and brightness of that image. For example, lowering the contrast will lower the "attitude" of the texture and vice versa.
That all probably sounded complex if you never played with it before, but it'll clear up in a very short time if you follow the above exercise.
The one thing in BT that helps out a lot here is of course the "refresh" button. You can keep the show open, edit the above images seprately and immediately see the result in BT by clicking the "refresh".
That's it, have fun, I sure did. Or rather do. I've played with this for hours and it's simply amazing what Michiel and his team has created here. Apart from messing with the texture images, there is a pretty much unlimited combination of settings to work with.
A heads up though! Texture mapping strains your GPU very hard. If you like me should've upgraded that ol' GeForce GTX660 a long time ago, this is another reason for finally doing it. Going hard at texture mapping will heat up my GTX660 card to the point that the screen starts flickering in other applications.
Regards
PiPPi


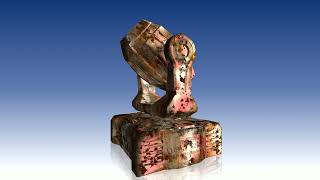
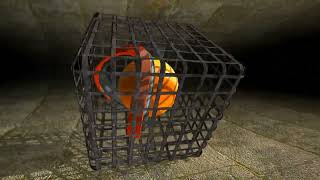
That's a really nice displacementmap!
Here's the relevant info from the user guide:

michiel, 5 years ago
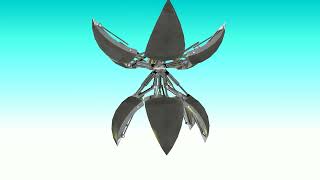
And here's what multitexturing is all about. Note that BluffTitler tries to keep it simple by limiting itself to max 3 textures per mesh. Game engines use 8 or more:
michiel, 5 years ago
Thanks Michiel, my "article" is for getting novices like myself to quickly understand the very basics of texturing in BT. The rest of the texturing possibilities like furmaps etc. will make for many more hours of course. Good thing is that I can take this knowledge to other tools as well, like texturing in Keyshot.
PiPPi, 5 years ago
On the issues of replacing an 8-year old and overloaded GPU, are there anything specific features to look for in buying a new one? Or should I consider all modern GPUs to be good enough to work well for this?
PiPPi, 5 years ago
Nice and simple explanation, it's good for all new users who aren't 3d experts. Where were you when I started BluffTitler?
Filip, 5 years ago
PiPPi, none of the installer shows, BixPacks and my community uploads require a heavy gaming PC. An average home PC will do.
michiel, 5 years ago
Michiel, thanks. But when I do pretty much any displacement textures in BT, the GPU (GeForce GTX 660) gets hot and intermittently makes the entire PC lag.
This goes for the "Displacementmapping1.bt" show as well. The GPU temperature goes from 33 C to over 80 degrees in a few minutes after having just loaded the show, without doing any work at all. Closing that show has the GPU temperature drop back to the low 30s within a few minutes.
Not sure what my problem is, my PC specs should be good enough for this: NVIDIA GeForce GTX 660 4Gb GPU, Intel Core i7 4770K CPU, ASUS Z87-A 1150 motherboard, and 16 Gb of RAM.
Regards
PiPPi
PiPPi, 5 years ago
The resulting lag makes working with other stuff for all practical purposes impossible. Just typing this is a PITA in that regards.
PiPPi, 5 years ago
OK, going from "Super High Quality/High Quality" to "Normal Quality" solves the problem. I lose some details of the textures but so be it.
It's easy to switch between resolutions, normal for working and the highs for seeing all the details.
PiPPi, 5 years ago
Aha! That explains it. I only use HIGH and SUPER HIGH when exporting as picture or video. Never when editing.
michiel, 5 years ago
Thank PiPPi for the informative tutorial. I never ventured into this area of editing as it sounded too complicated. But now it's easier to understand.
lightads, 5 years ago